Crackly Brownie Bites Recipe — The Mixing Cue That Helps
Table of Contents
Table of Contents
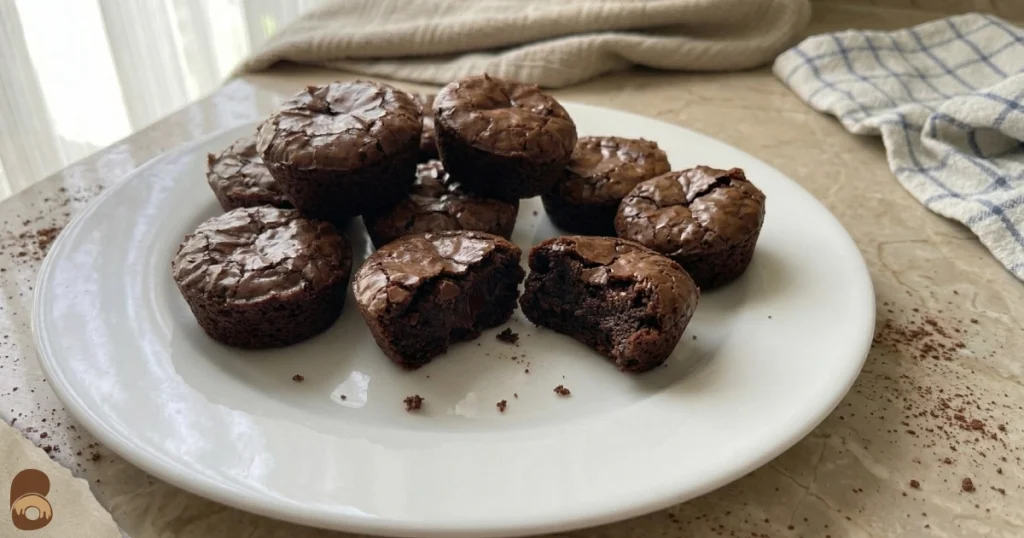
This brownie bites recipe produces fudgy, dense centers with a shiny crackled top — and the reason it works consistently comes down to one specific moment in the mixing process. → Jump to Recipe — Reading the full article explains the mechanism behind that step, so next time you can adjust by feel instead of guesswork.
What You’ll Learn:
- Fudgy brownie bites with a crackly, paper-thin surface
- The exact batter cue that tells you the emulsification is complete
- Why does this work in a standard home oven without special equipment
- How to avoid the dry, cakey texture that mini brownies are prone to
If you want the full method comparison — box mix versus scratch, silicone versus metal pan — the Brownie Bites Guide covers all of it. This article is the execution-focused piece: here is the recipe, here is how to read it.
Crackly Brownie Bites Recipe
This is a one-bowl, no-mixer recipe that produces 24 mini brownies with a fudgy center and a slightly crackled top. The batter comes together in under 15 minutes — and there is a specific moment in the mixing where the batter tells you it is ready. That cue is embedded directly in Step 4 so you see it in real time rather than read about it after the fact.
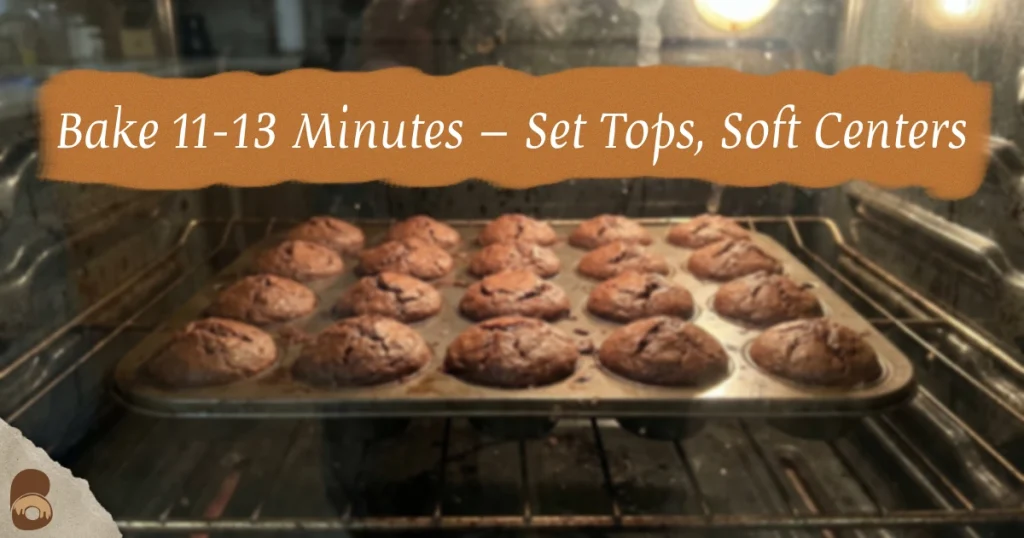
Yield: 24 brownie bites | Prep: 12 min | Bake: 11–13 min | Total: ~25 min
Ingredients
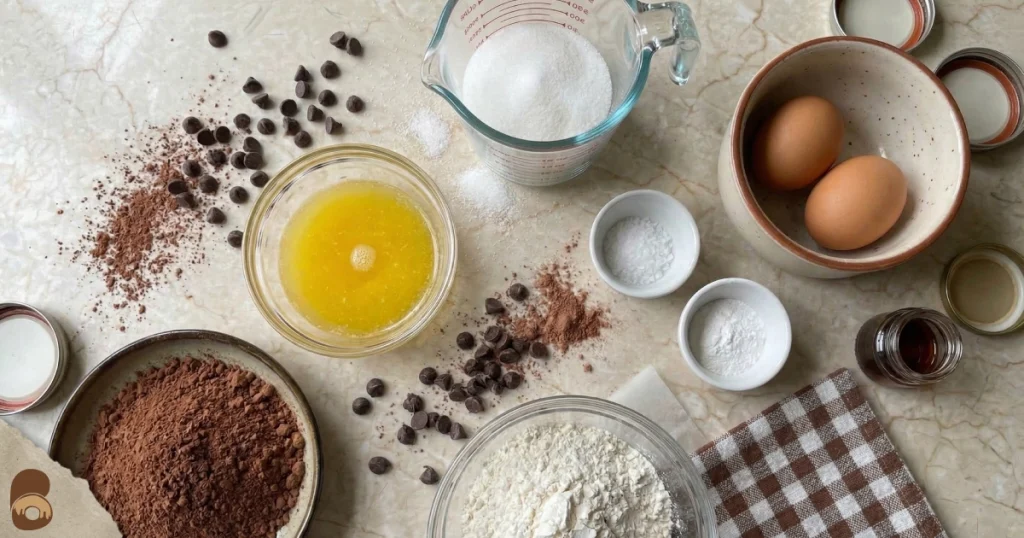
Wet:
- 115g (½ cup) unsalted butter, melted and still warm
- 200g (1 cup) granulated sugar
- 2 large eggs, room temperature
- 1 tsp pure vanilla extract
Dry:
- 65g (½ cup + 1 tbsp) all-purpose flour
- 40g (½ cup) Dutch-process cocoa powder
- ½ tsp fine salt
- ¼ tsp baking powder (leave it out if you want a denser, flatter bite)
Add-ins (optional):
- 60g (⅓ cup) semi-sweet chocolate chips
Steps
- Preheat and prep the pan. Set your oven to 325°F (160°C). Grease a 24-cavity mini muffin pan thoroughly — work the grease into the seam between the wall and the base of each cavity, not just across the flat bottom. That seam is where the brownie bites weld to the pan.
- Combine butter and sugar while the butter is warm. Pour granulated sugar directly into the warm melted butter and whisk for 60–90 seconds. You want the mixture to lighten slightly and look like wet sand just beginning to come together. If the butter has cooled to room temperature before the sugar goes in, you lose the heat that starts the emulsification process — and the crackled top with it.
- Add eggs one at a time. Add the first egg and whisk hard for 30 seconds before adding the second. Add vanilla with the second egg. The batter should look glossy and slightly ribboned when you lift the whisk — not liquid, not thick, but pulling.
- The mixing cue. (This is where it happens.) With both eggs incorporated, keep whisking for a full 60–90 seconds without stopping. Watch the surface of the batter: when it shifts from opaque to visibly glossy and starts pulling away from the bowl sides in thin, elastic sheets — stop. That glossy pull is the emulsion stabilizing. It is the same surface behavior that migrates upward during baking and sets into the crackle. Over-mix past it, and you deflate what you just built. You and under-mix get a flat, matte top — not wrong, but not what this recipe is after.
- Fold in the dry ingredients. Add cocoa, flour, salt, and baking powder. Switch to a spatula and fold — not stir, not whisk. Count your folds: about 12–15 is enough. Stop the moment no dry streaks remain. Every fold past that point trades fudge for cake texture.
- Fold in chocolate chips if using. Two or three passes, no more.
- Fill the cavities. Spoon or scoop batter to about ¾ of the way up each cavity. Not to the rim — if you overfill, the batter climbs the walls and domes instead of setting with a flat, crackled top. If you underfill, the edges lose structure, and the bite comes out thin.
- Bake. 11 minutes for fudgy centers with a slight jiggle when you gently tap the pan. 13 minutes if you want fully set, clean edges. The surface should look matte and set — not wet — but resist pressing it to check. They firm up during the cool.
- Cool in the pan for 10 full minutes before removing. Then run a thin offset spatula or butter knife around the edge of each cavity before turning the pan over. Rushing this step is the most common reason brownie bites tear.
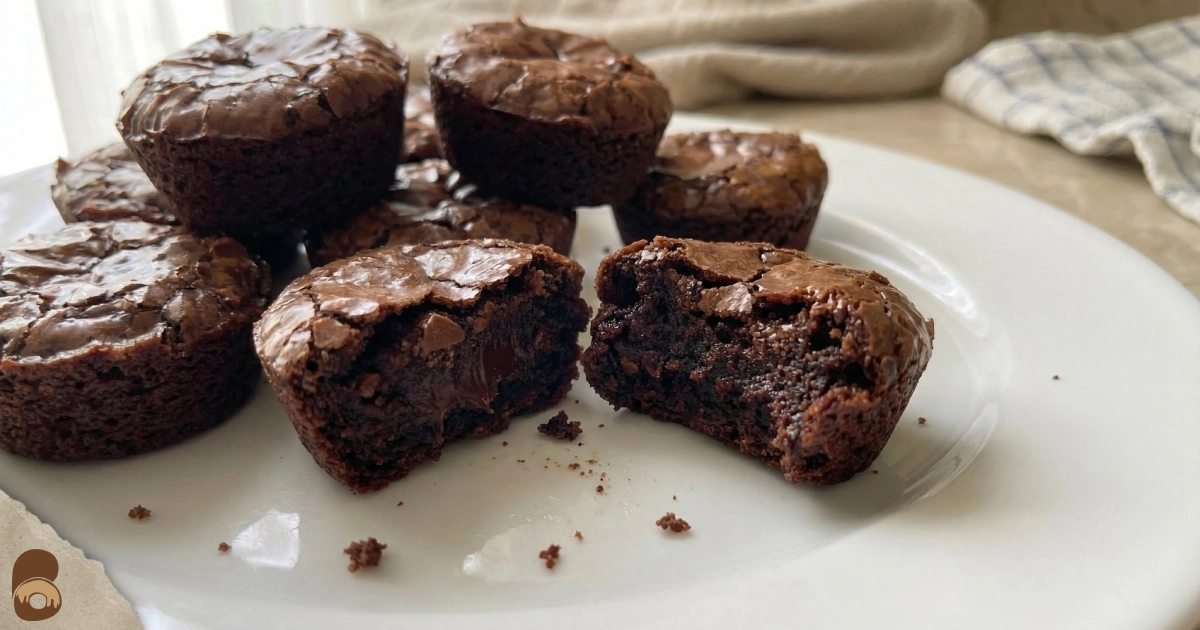
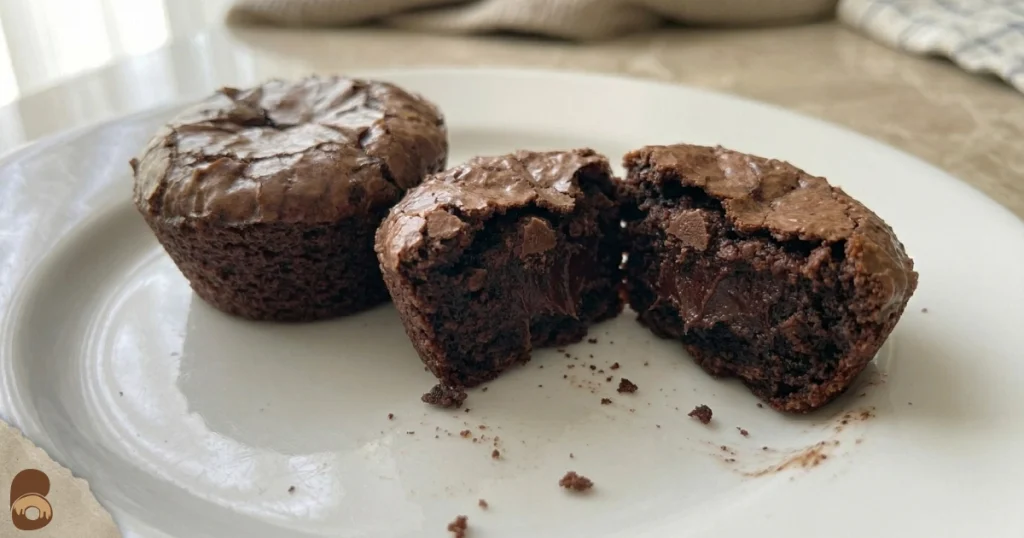
What it should look like when done: A slightly domed top with a paper-thin crackled shell that catches the light. Broken in half, the center should be dense and moist — no gummy raw line through the middle, no dry crumble at the edges.
Storage: Airtight container at room temperature for 3 days, refrigerator for 5. Bring refrigerated bites back to room temperature before eating — cold dulls the fudge texture noticeably.
Why This Brownie Bites Recipe Gets a Crackly Top
That step where I told you to watch for the batter pulling away from the bowl sides in thin, elastic sheets — that is the moment the crackle is built, not the moment it appears.
When you whisk warm sugar into warm butter and then beat in eggs, you are building a temporary emulsion: fat, water, and dissolved sugar aligning under agitation. The dissolved sugar in that emulsion migrates toward the surface during baking. As it hits the oven heat, it forms a thin sugar-protein film that sets into the crackle you see when the pan comes out.
The gloss you spotted in the bowl during Step 4? That is the same film forming early — it is the visual evidence that the emulsion is stable and the sugar is in the right state to do its job on the surface.
When recipes say “mix until combined,” they stop before that stability is reached. The sugar stays dispersed through the batter instead of concentrating at the surface. The result bakes up even and matte — not a failure, just a different outcome. The extra 60 seconds of whisking is the difference between the two.
In my baking training, this came up repeatedly in the context of chocolate work: emulsification is not a background process you set and forget. It has a window, and learning to see it by eye — rather than by timer — changes how you approach most chocolate recipes, not just this one.
Troubleshooting These Brownie Bites
If yours came out looking nothing like the description above, the issue is almost always one of three things — and each has a specific fix.
No shiny or crackly top
Why it happens: The emulsion in Step 4 did not fully develop — most often because the butter had cooled before the sugar went in, or the post-egg whisking stopped too early.
Fix:
- Next batch: add sugar to butter while it is still warm, not after it has sat and cooled.
- Commit to the full 60–90 second whisk in Step 4. You are looking for the glossy pull, not just “it looks smooth.” Those are different things.
Dry or cakey texture
Why it happens: Over-folding after the dry ingredients went in, or the oven ran hot, and the bites set on the outside before the center finished.
Fix:
- Use a spatula only from Step 5 forward — no more whisking. Count your folds and stop at 15.
- If your oven runs warm, drop the temperature to 320°F and pull at 11 minutes. Mini brownies are less forgiving of temperature variance than full-pan brownies because there is less batter depth to buffer the heat.
Brownie bites stuck to the pan
Why it happens: The seam between the cavity wall and base was not greased, or the bites were removed before the 10-minute cool-down was complete.
Fix:
- For the current batch — work a thin offset spatula slowly around each cavity before inverting. Do not force them.
- For the next batch: grease specifically into the seams, not just across the base. If sticking is a recurring issue, the Brownie Bites Guide compares pan types and prep methods in detail.
Sunken or gummy centers
Why it happens: Pulled from the oven before the center was set — a slight jiggle is fine, but if the center visibly rippled like liquid when you tapped the pan, it needed more time.
Fix:
- Return the pan to the oven for 1–2 more minutes and check again.
- For future batches: “jiggles as a unit” and “ripples like liquid” look similar at a glance. The test is whether the whole surface moves together or whether the center moves independently. Only the first one is ready.
Frequently Asked Questions
Q: How long to bake brownie bites?
11 minutes for fudgy centers with slight jiggle; 13 minutes for fully set edges. Both work — the difference comes down to how you want the center to feel when bitten.
Q: How long to cook brownie bites — is that the same as bake time?
Same thing. 11–13 minutes at 325°F (160°C). The lower temperature matters here — higher heat sets the outside crust before the center finishes cooking through.
Q: Why didn’t my brownie bites get shiny tops?
The emulsion in Step 4 did not fully stabilize. Butter needs to be warm when the sugar goes in, and the 60–90 second whisk after the eggs is not optional — that is where the glossy surface forms.
Q: Can I use a box mix for this brownie bite recipe?
Yes. Skip Steps 2–4 and mix the box batter according to its instructions, then follow the fill, bake, and cooling steps above. You won’t get the same crackly top because the emulsification step is pre-handled in the mix, but the fudgy center and clean release still apply.
Q: Why are my brownie bites cakey instead of fudgy?
Two causes working together in most cases: over-folding after the dry ingredients go in, and baking past the jiggle point. The troubleshooting section above covers both with specific adjustments.
Next Batch
You now have a brownie bites recipe that builds the crackle into the mixing rather than hoping it appears in the oven — and a clear visual cue so you know exactly when the batter is ready.
The 60–90 second whisking window is the step most standard recipes skip entirely, which is why the top looks right one time and flat the next. Now that you know what to look for, it is repeatable.
Keep baking brownie bites. Follow @BakeOrbis on Pinterest for recipes, troubleshooting guides, and techniques that actually work in real kitchens.
Share your experience and help others!
Tried this recipe? Leave a rating and make someone’s day tastier
Be the first to rate this recipe and help others discover it!