Fudgy Two Bite Brownies — Why the Smaller Pan Changes the Texture
Table of Contents
Table of Contents
Two bite brownies sound simple, but the small format changes more than size. This recipe is built to give you a glossy top, a soft center, and edges that stay defined without turning dry by the time the middle is done.
→ Jump to Recipe — If you keep reading, I’ll show you why mini brownies behave differently from a full pan and how to keep that from working against you.
What You’ll Learn:
- How to bake two bite brownies with a dense, fudgy center and clean edges
- The one mixing and baking cue that matters most in a mini pan
- Why does this method work more reliably in a home kitchen
- How to avoid cakey texture, dry edges, and sticking
If you’ve already read the main brownie bites guide, think of this as the size-specific follow-up. That guide covers the broader framework; this one narrows in on what changes when you want a true two-bite brownie instead of a standard mini square or a full-pan slice.
Recipe: Rich Two Bite Brownies
These two bite brownies bake up with a shiny top, a close, fudgy crumb, and enough structure to release cleanly from a mini muffin pan. What makes them reliable is that the method accounts for how fast small brownies set at the edges. In my training, one thing became obvious fast: mini-format brownies punish overmixing and overbaking earlier than full-pan brownies do, so the recipe has to be built around visual cues, not just time.
Yield: 24 brownies | Prep: 15 min | Bake: 11–13 min | Total: 35 min
Ingredients
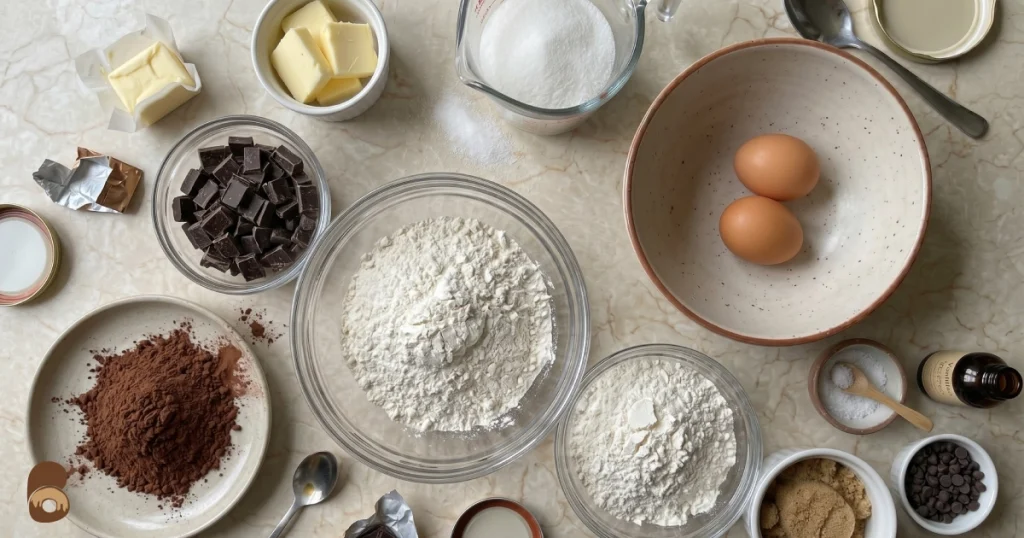
Dry:
- 85 g all-purpose flour
- 25 g unsweetened cocoa powder
- 1/2 tsp fine salt
Wet:
- 115 g unsalted butter
- 115 g dark chocolate, chopped
- 150 g granulated sugar
- 2 large eggs, room temperature
- 1 tsp vanilla extract
Add-ins:
- 60 g mini chocolate chips
- 1/2 tsp espresso powder, optional
Steps
- Preheat the oven to 175°C / 350°F and grease a 24-cup mini muffin pan well. I coat each cavity all the way up the sides, then lightly grease the flat top around the wells too, because brownie tops can catch there as they rise.
- In a heatproof bowl, melt the butter and chopped chocolate together until smooth. Let it cool for 3 to 4 minutes so it stays fluid but not hot enough to scramble the eggs.
- Whisk in the sugar until the mixture looks thick and glossy, then add the eggs one at a time, followed by the vanilla. The batter should look satiny, not airy. This is where texture starts: if you whip in too much air here, the brownies bake up lighter and more cakey than a two-bite brownie should.
- Add the flour, cocoa powder, salt, and espresso powder if using. Fold gently with a spatula just until the last dry streak disappears, then fold in the mini chocolate chips. I stop as soon as the batter turns evenly dark and heavy-looking.
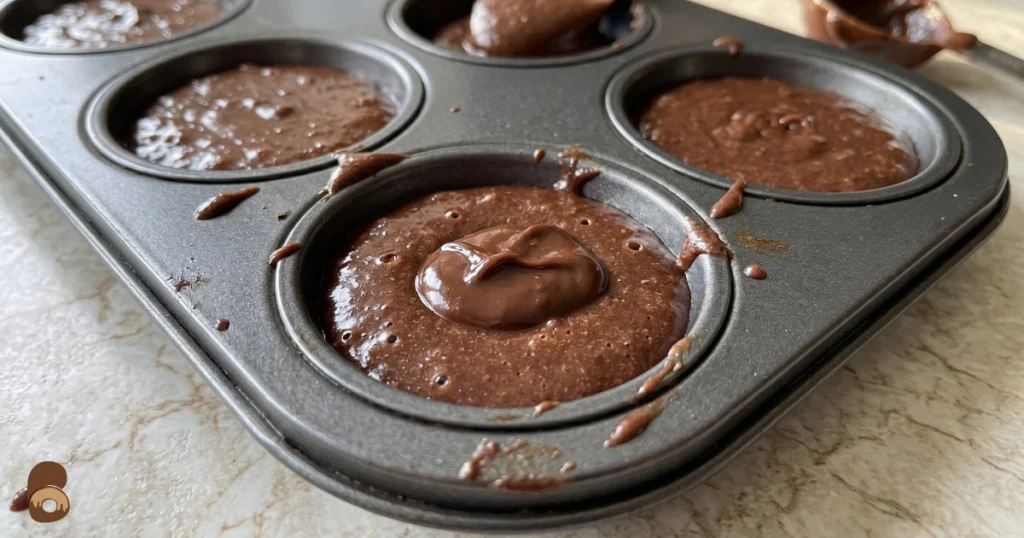
- Divide the batter evenly into the pan, filling each cavity about 3/4 full, roughly 1 1/2 tablespoons each. A small scoop helps here. In a mini pan, uneven filling gives you mixed results fast—some dry, some underdone.
- Bake for 11 to 13 minutes, until the tops look set and lightly crackled, but the centers still look just slightly soft. The edges should look matte, not wet. I start checking at 10 minutes because small brownies move from fudgy to overbaked quickly.
- Let the brownies cool in the pan for 10 minutes, then gently loosen the edges with a thin offset spatula or plastic knife and lift them out. If one resists, give it another minute instead of forcing it.
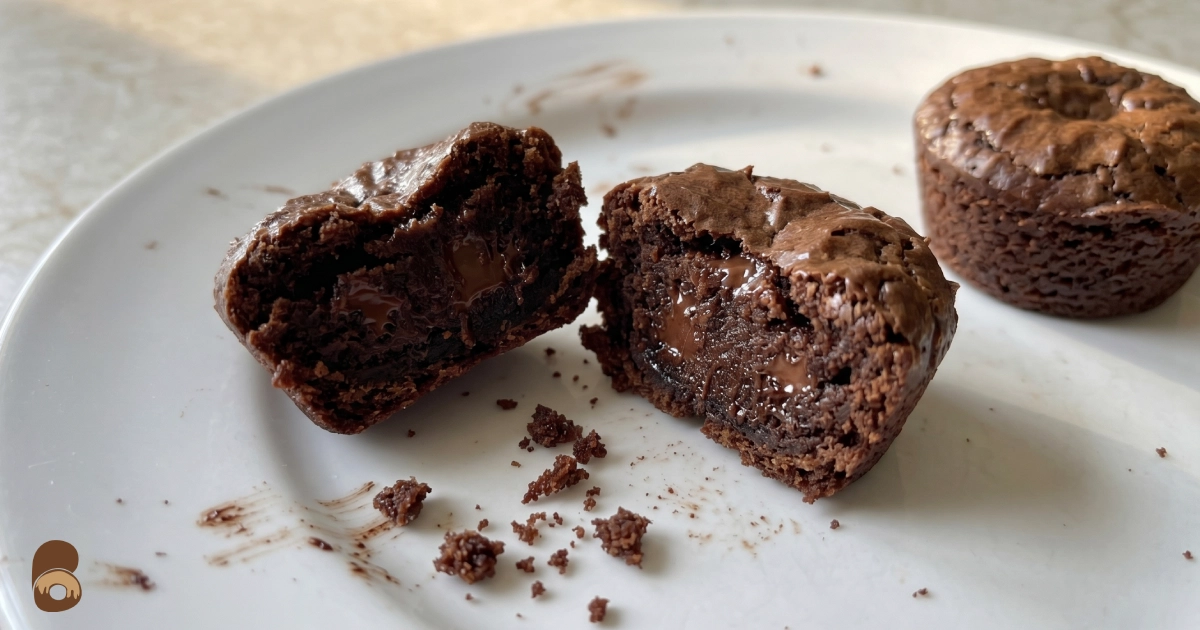
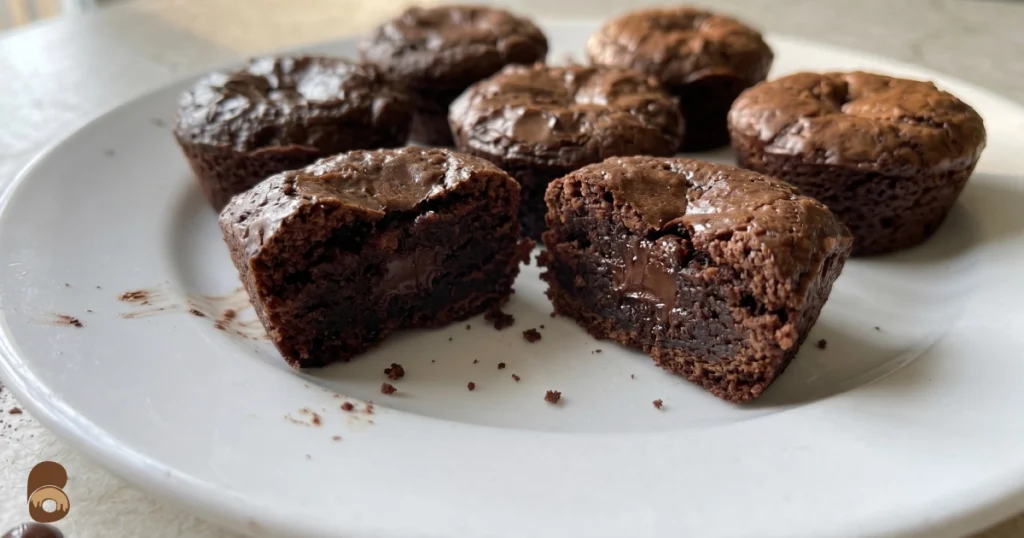
What it should look like when done
The tops should be shiny to lightly crackled, with edges that hold their shape and centers that still feel soft when you press lightly. Once cooled, the crumb should look dense and moist, not airy or crumbly, and the chocolate smell should still feel deep rather than dry or dusty.
Storage: Keep the brownies in an airtight container at room temperature for 3 days. If you want them extra fudgy the next day, store them tightly covered as soon as they are fully cool. For longer storage, freeze well wrapped and thaw covered so the surface stays soft.

Why These Two Bite Brownies Stay Fudgy
That step where I told you to stop mixing as soon as the dry streaks disappear is where the difference happens.
Small brownies have a higher edge-to-center ratio than a full pan. That means there is less protected middle and more surface exposed to heat, so any extra air in the batter or extra minute in the oven shows up faster. In my baking training, I learned to think of mini brownies like repeated corner pieces: great if you want definition, less forgiving if you want a soft center.
That is why this recipe keeps the batter thick, limits mixing after the flour goes in, and pulls the brownies when the center still looks just a little soft. You are not underbaking them—you are letting carryover heat finish the job. If you want a crisper top with the same basic texture goal, the brownie bites recipe walks through the mixing cue in more detail.
Two Bite Brownies Variations
If you want to push these in a slightly different direction, here is what changes and why.
Bakery-Style Softer Bite
If you want a lighter, softer two bite brownie with a more uniform crumb, add 15 g more sugar and bake closer to 12 to 13 minutes. The extra sugar softens the bite, but you lose some of the dense chew this base version gives you.
Darker Chocolate Finish
If you want the brownies less sweet and more chocolate-forward, use 70% dark chocolate and keep the espresso powder. This shifts the flavor without changing the structure much, but the center will feel a little tighter once cool.
Cleaner Release Method
If your pan has a history of sticking, line each cavity with a small parchment sling. It takes a few extra minutes up front, but it makes removal much easier and gives the edges a neater finish. This is especially helpful if you are testing a new pan or making a larger batch of mini brownie bites.
Troubleshooting
If your batch looked promising but tasted wrong, the fix is usually in the pan behavior, not the idea of the recipe.
The brownies turned cakey
Why it happens: Too much air was mixed in, or they stayed in the oven until the centers were fully firm.
Fix:
- Next time, whisk the eggs and sugar only until smooth and glossy, not fluffy.
- Fold the dry ingredients in gently and stop the moment the batter turns uniform.
- Pull the brownies when the tops are set, but the center still looks a touch soft.
The edges got dry
Why it happens: Small brownies bake from the outside in so quickly that a minute or two makes a bigger difference than it does in a full pan.
Fix:
- Start checking at 10 minutes, even if your oven usually runs cool.
- Fill the cavities evenly so the whole pan bakes at the same pace.
- If your pan darkens baked goods fast, lower the oven by 10°C / 25°F next time.
They stuck in the pan
Why it happens: Brownie batter is high in sugar and wants to cling to a mini pan, especially while still hot.
Fix:
- Grease the pan more thoroughly than feels necessary, including the top rim.
- Let the brownies cool for 10 minutes before loosening them.
- Run a thin tool around the edge first, then lift gently instead of pulling upward fast.
The centers sank too much
Why it happens: Usually, the batter had too much air, or the brownies were pulled before the structure had set at all.
Fix:
- Keep the mixing gentle after the eggs go in.
- Bake until the top is set and lightly crackled, not wet and shiny.
- Let them cool in the pan before moving them.
Frequently Asked Questions
Q: Are two bite brownies the same as brownie bites?
Not always. People use the names interchangeably, but two bite brownies usually imply a very small, snack-style brownie, while brownie bites can include a wider range of sizes and textures.
Q: Why do two bite brownies dry out so fast?
Because they have more edge in proportion to the center. In a mini pan, heat reaches the middle quickly, so even a short overbake can push them past fudgy.
Q: How full should I fill the pan for two bite brownies?
About 3/4 full is the sweet spot for most mini muffin pans. That gives the brownies enough height for a soft middle without making the edges overcook first.
Q: Can I use this as a brownie bites recipe for a different pan?
Yes, but the bake time changes. If your cavities are deeper or wider, start with the same batter cues and treat the oven time as flexible rather than fixed.
Q: What is the difference between two bite brownies and little bites brownies?
Usually, it comes down to style and expectation more than one strict formula. A future little bites brownies guide will break down the texture and size differences more specifically.
Next Batch, Better Texture
You now have a recipe for two bite brownies that is built for the smaller format instead of pretending mini brownies bake like a shrunken full pan. Once you know what the batter should look like and when to pull the tray, the texture gets much easier to control.
If you want to go further, start with the full brownie bites guide for pan prep and release strategy, then use the brownie bites recipe if you want a more defined crackly top. When those are live, I’d also pair this with mini brownie bites for pan-specific sizing and little bites brownies for texture comparison.
Keep baking smarter. Follow @BakeOrbis on Pinterest for recipes, troubleshooting guides, and techniques that actually work in real kitchens.
Share your experience and help others!
Tried this recipe? Leave a rating and make someone’s day tastier
Be the first to rate this recipe and help others discover it!